

The RI8608 Linux EPC is a Cassini System Controller running xUbuntu 24.04 (or later) and uses a USB RIFL Master, Saturn and DbManager Guru Apps, ArcaOS desktop (Oracle VirtualBox) for running the Cassini application. The EPC uses a USB-A to USB-B cable to connect with the RI8568D Cassini16 Infrastructure or RI8513A USB RIFL Master TIM.
Reference:
Audience: Administrators and Technicians working with the Cassini ATE.
Hardware:
NUC Mini PC - ASUS Nuc 14 Pro
- Front: USB 3.2 Gen 2x2 Port (black) aka "USB C"
- Rear: 12-20 V DC Input Jack, 2x HDMI 2.1 TMDS Ports, LAN Connector, USB 3.2 Gen 2 Port (blue); USB 2.0 Port (black), 2x Thunderbolt Ports aka "USB C"
- Power Supply, NEMA C-15 US Power Plug
Not Included - Must be supplied by the customer
- USB or Bluetooth Keyboard/Mouse
- Monitor with Thunderbolt (USB-C), DisplayPort (DP, DP Passthrough) or HDMI and cable (NUC supports multiple displays) - Avoid High DPI for professional designer or fast refresh rate monitors for gaming, avoiding extreme contrast ratio and max brightness specs.
- RI8613A EPC USB RIFL Master TIM or RI8568D Cassini 16 Infrastructure (USB A to USB B cable included with both models)
- Facility must provide two standard 15A wall outlets for NUC and Display and a workspace.
Software:
- Linux OS xUbuntu 24.04 LTS
- RI System Software including Guru, Guru Apps, and ArcaOS Desktop in Oracle VirtualBox
- RIFL Master USB Drivers
- Guru Server (local Guru) & ArcaOS Container (Oracle VirtualBox 7+)
- Java (OpenJDK 11+), Python3
- DbBrowser for SQLite - for ritdb analysis
- Default password for "cassini" user is "Cassini16" (and sudo)
- Shared Network Drives mountable via FUSE user mount GUI or system level to SAMBA (SMB), NFS, and more.
To Install RI8608 Linux NUC:
- (optional) If upgrading Cassini16 Infrastructure Rev A, B or C; remove the existing RI8574 ArcaOS EPC and then Latch the RI8513A USB RIFL Master TIM.
- (optional) Mount the NUC to the Infrastructure NUC Mounting Plate https://www.roos.com/parts/N0T9464A
- Connect the USB-B side to the USB RIFL Master and the USB-A side to any available USB-A port on the Linux NUC.
- Connect the Display (HDMI or USB-C)/Keyboard&Mouse(USB), Network and Power cable to the appropriate plugs. (See Figure 1)
- Power ON the Display by pressing the power button.
- Power ON the NUC by pressing the power button.
- Power ON the Tester by rotating the Cassini 16 Infrastructure switch to START position and release to ON position.
To Setup Network & Change Hostname:
- Use Network Manager UI from the taskbar or follow the steps from these instructions found online by searching "static ip xubuntu 24.04 LTS".
How to Configure a Static IP Address on Ubuntu 20.04/22.04 LTS — Step-by-Step | by Krishnendu Bhowmick | Medium
https://krishnendubhowmick.medium.com/how-to-configure-a-static-ip-address-on-ubuntu-20-04-22-04-lts-step-by-step-4a35d6662083 - Choose Network Manager icon > Edit Connections... (See Figure 1)
- Select netplan-en86s0 (or similar) and then click the settings icon (See Figure 2)
- Select IPv4 Settings tab, change Method to Manual, click Add button (See Figure 3).
- Type in the following:
Address = ###.###.###.###
Netmask = ## (or Subnet ###.###.###.###)
Gateway = ##.##.##.## - Then click on Save. (Network is now configured)
- Choose Network Manager icon and then toggle (disable and enable) Enable Networking to load the new configuration.
- Click on the Applications menu and choose Terminal Emulator. (Figure 4)
- Type the following and press [Enter] key
sudo hostnamectl set-hostname '<hostname>' - Type "Cassini16" as the password for cassini prompt and press [Enter] key.
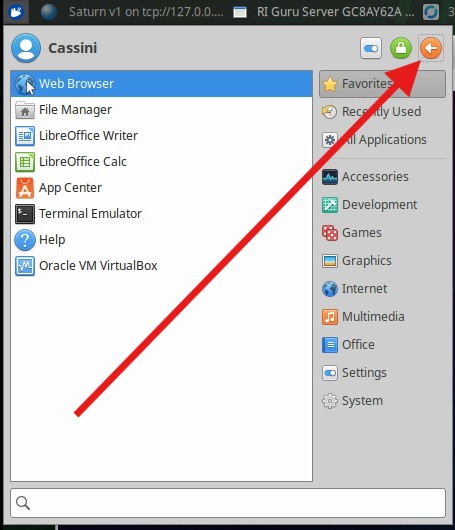
- Rby choosing the Applications menu > orange Logout icon > Restart button.
- The NUC will reboot. Confirm that the Guru Logon button is now green, connected with the Guru server.
Figure 1: Network
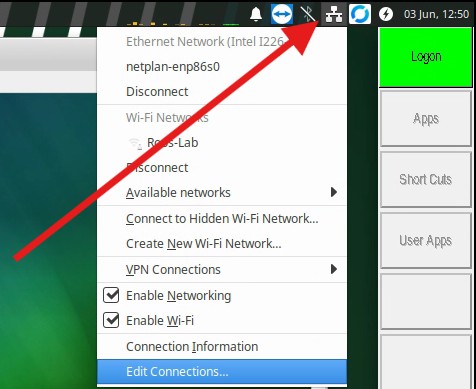
Figure 2: Edit netplan...
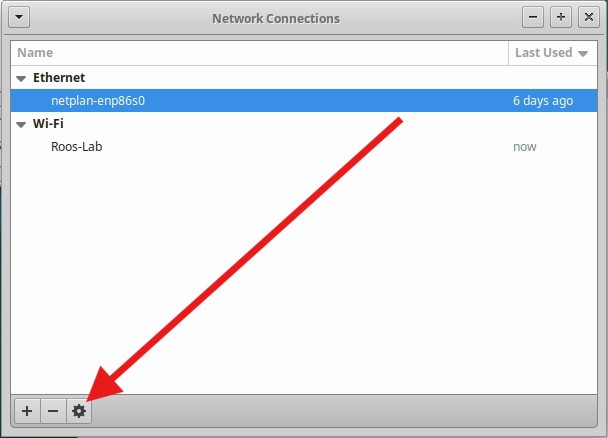
Figure 3: Enter IPv4 Settings for TROOS_08
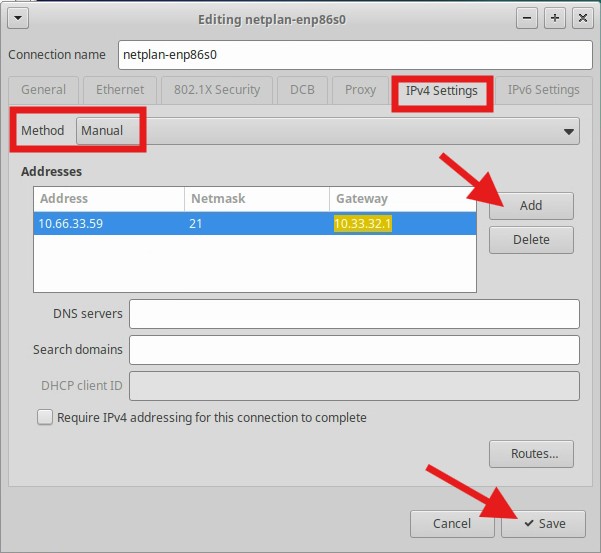
Figure 4: Applications > Terminal
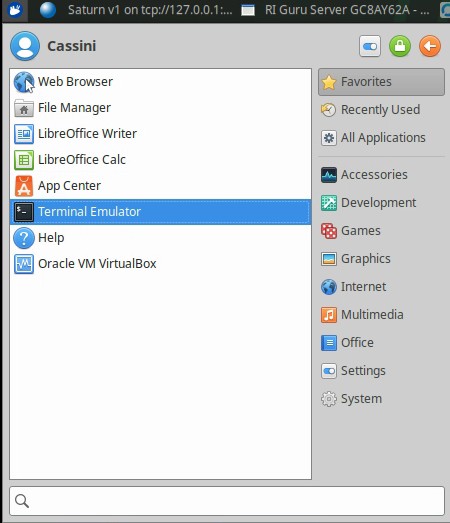
Figure 5: set-hostname
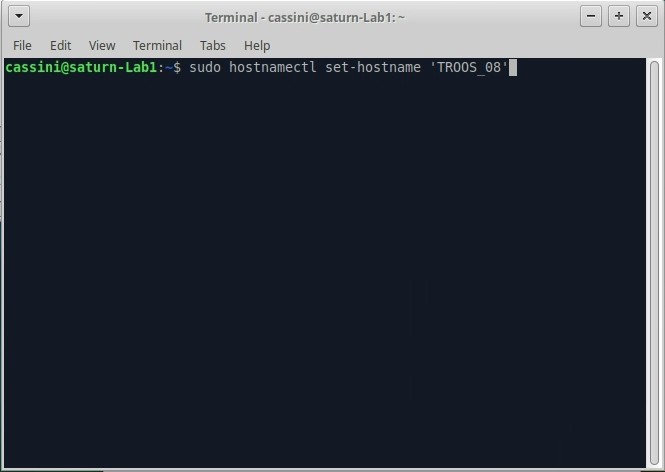
Figure 6: Applications > Logout
To Install and Configure VNC Server to launch on login with xUbuntu:
- Move the Linux NUC to a network connection with direct Internet access.
- Choose the xUbuntu Launcher "whisker" icon and choose Terminal Emulator application.
- Enter the following commands:
sudo apt update
sudo apt -y install tigervnc-scraping-server
mkdir -p ~/.vnc - vncpasswd
(enter new VNC client password twice and then "n" to skip view-only password -- "Cassini16" is factory default password) - Launch server and confirm results without any errors.
x0vncserver -localhost no -passwordfile ~/.vnc/passwd -display :0 - Create startup script:
nano ~/start_vnc.sh - Copy and paste the following:
#!/bin/bash
sleep 10
x0vncserver -localhost no -passwordfile ~/.vnc/password -display :0 - CTL+X to exit and y to confirm saving enter for same filename
- Make executable with:
chmod +x start_vnc.sh - Close the Terminal Emulator app and confirm with a remote VNC client that the current desktop is now shared at the expected hostname and password.
- Choose the xUbuntu Launcher "whisker" icon and type "startup" and choose Session and Startup to open the settings window.
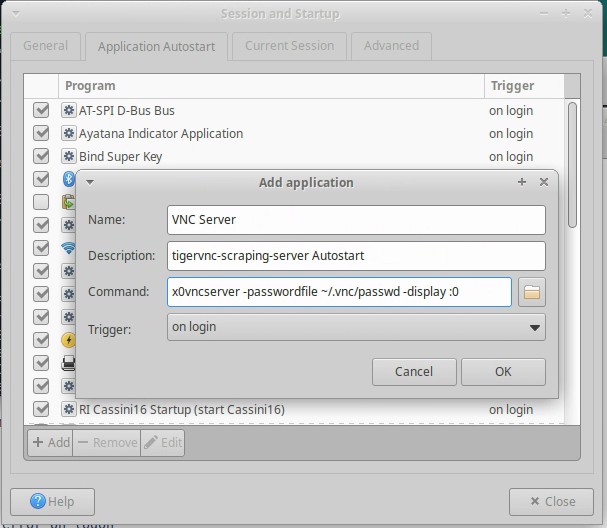
- On the Application Autostart tab, choose +Add button and enter the following: (see Figure 1)
Name: VNC Server
Description: tigervnc-scraping-server Autostart
Command: /home/cassini/startvnc_sh
Trigger: on login - Click OK to and Close.
- Choose the xUbuntu Launcher "whisker" icon and choose Logout icon (orange arrow) and choose Restart.
- After the Linux NUC starts and the user is automatically login completes, confirm with a remote VNC client that the current desktop is accessible.
Figure 1: Add VNC launch command on logon
To Disable Lock Screen:
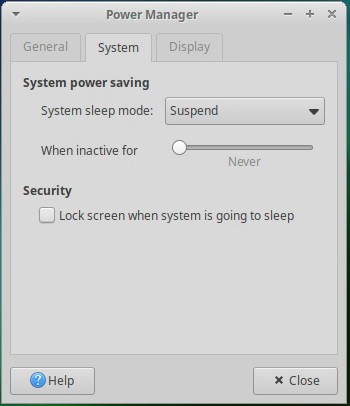
- Open Application menu and type "Lock" then select Power Manager.
- Click on System tab and slide "When inactive for" slider to the far left so it says "Never".
- Uncheck Lock screen when system is going to sleep under Security.
- Choose Close when done.
To Adjust Window Scaling for High DPI Displays (4k):
- There are 3 places to adjust to fit a large, high resolution display: Appearance Scaling and Font DPI, and Display Scale. Open Application menu and type "Scaling" then select Appearance..
- From the Settings tab, change Window Scaling to 2x.
- Also, check Fonts tab, edible Custom DPI setting and adjust the value to fit your preference.
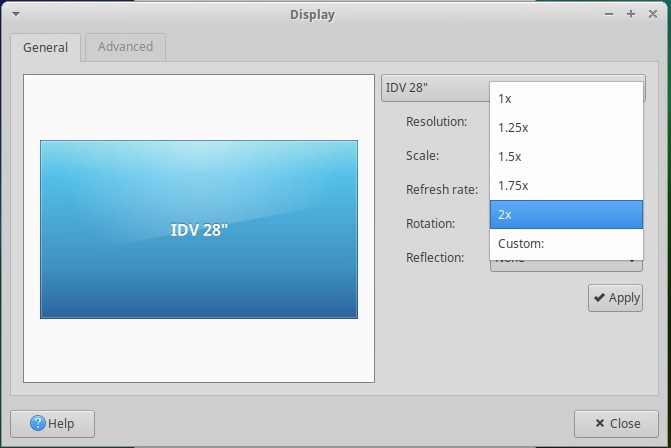
- Also from the Applications menu, type "Display" and select Display settings.
- Choose Close when done.
- Adjust Scale to 2x and choose Close.
- Also, the ArcaOS Desktop VirtualBox window can be switched to Scale mode by pressing the [Host] +C keys (right CTL). Adjust the window to fit comfortably. The ArcaOS desktop resolution can also be adjusted and set to fullscreen when multiple monitors are used.
Figure 1: Appearance Settings > Window Scaling
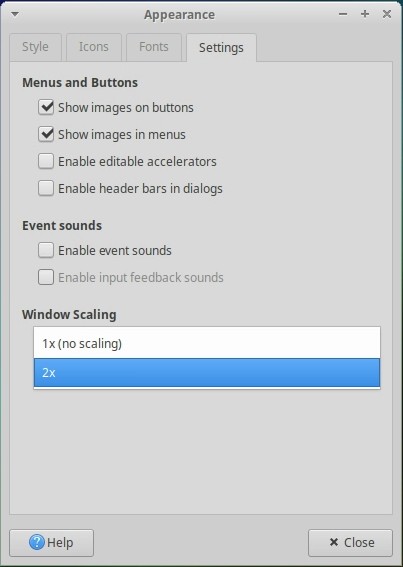
Figure 1: Display > Scale
To Change Guru ID and Update the RiTesterDef used by Saturn: (See Rename Tester)
The RiTesterDef object is used to assign Instrument Names by storing the serial number and the preferred name. This object must be manually specified in Saturn and is loaded from the Tester menu in Cassini app. If upgrading or moving the Linux NUC to a different tester, follow the steps below to choose the correct Tester Def.
- Identify the correct Tester Def. From the Cassini app, choose System > Tester button, the active tester def title is displayed in the window's title bar.
- Open a Terminal window to activate Guru ID and restore config. (Note: Contact Roos Support for ".vfd file if it is not already installed -- replace <ID> with the actual Guru ID i.e. "GM23AVCA")
sudo mount -t vfat -o loop ~/Downloads/<ID>GuruKeys.vfd /media/floppy -o gid=disk
sudo unzip -o /media/floppy/GURUKEYS/<GuruID> -d /media/floppy/
~/RiApps/guruServer/guruServerStop.sh
~/RiApps/guruServer/startApp.cmd -RiBackupGuru <ServerIP> -RiUpdateGuru <ServerIP> - From Guru choose Logon and System > Restore to get all owned objects, including the Guru Address book entries.
- Update Saturn config by matching RiTesterDef Name in line 22 of bootCassini.txt. Open a Terminal window and type:
nano ~/RiApps/GuruApps/GF10RE2A/bootCassini.txt
Replace <TESTER DEF NAME> and close and save.
sync,topic=admin/app,omap=^runLocal+channel=rtalk+className=rtalk.SmPortalForRtalk+rtLoad=GAKRE8CABJADXV00+rtDebug=true+rtLaunch=RiRemoteViewModels:register+tester=<TESTER DEF NAME> - Close Saturn and it will restart automatically, using the updated Tester to assign instrument names.
Note: The Cassini app lauched from Short Cuts menu in the VirtualBox container loads the last saved TesterDef or what is saved in the RiPreferences object that is updated with Options > Save State.
To Apply OS Updates:
- Internet or local repository must be accessible and configured. Refer to xUbuntu instructions when migrating to the next Long Term Support (LTS) release.
- Open a terminal window and type:
sudo apt upgrade
To Backup or Prepare for Disaster Recovery:
- Physically remove the M2 drive and use a drive cloning appliance or other means to take a suitable disk image.
- The OS has been specifically prepared for use with the USB RIFL Master connection on the Cassini Infrastructure.
- Follow the steps to "Activate a Specific Tester" during recovery.
Using Cassini with ArcaOS Desktop Container:
Guru and the ArcaOS Desktop container is automatically launched at startup. All data is stored and accessed directly from the "/home/cassini/Cassini-D" directory. No information is stored "in" the container, it is just a run-time environment. After choosing Log On to Guru, launch Cassini from the Short Cuts or User Apps button that will be disabled (grey) if the container and Db Manager are not running. Once Cassini is running, all functionality is the same and follow the standard procedures.
Use these VirtualBox keyboard shortcuts:
- IMPORTANT: The Cassini system software occasionally requires ALT+Click to be used to modify values in a table (Limit table, or Test Exec Bins). Press the WIN or OpenApple OS key (Win+ALT+Click) instead of just holding the ALT key, as instructed.
- Host key is the right CTL Key, used to access VirtualBox features.
- Host + Home keys to view the Machine menu.
- Host + C keys to toggle scaled mode desktop to be resized while scaling every internal window.
- Host + F keys to toggle Full screen mode.
- The "D:" drive from within the Cassini application is mapped to "/home/cassini/Cassini-D" directory in Linux. When using the Cassini app, choosing Save > File (.txt, .csv or .stdf) to the D:\Shared location will appear in the "~/Cassini-D/Shared" folder. Likewise, .rtidb datalogs are stored in "D:\RiApps\Data" or ~/Cassini-D/RiApps/Data" folder.
- Launch Oracle VM VirtualBox Manager change Machine settings for the container.
- If "Snapshot 1" is created, then the launch script will restore that snapshot before starting the VM, slightly decreasing startup speed. Remove "Snapshot 1" to have the VM boot normally. This may be required if the Cassini app message window appears RED, indicating it can not communicate with the RIFL master.
Troubleshooting:
- Short Cuts/User Apps buttons are grey. Check Cassini16 container, restart the container if not responding by opening Oracle VirtualBox Manager app in Windows and choosing Machine > Restart.
- Cassini application background is red. This indicates RIFL communication error and is likely a container or USB Driver issue. Restarting the Linux OS would likely quickly resolve this issue. Otherwise, targeted restart of either the container or Db Manager application. After attempting any interventions, choose System > Equip > Startup and Ok fron the Cassini application to proceed.
 RIFL Test Failures? Check the USB cable from the EPC USB RIFL Master TIM to the RI8608 Secure EPC.
- Drive Health Check? See disk - What is the best way to scan a hard drive/check health in Ubuntu? - Ask Ubuntu
- Rarely, an OS update may require an update to Oracle VirtualBox. From Oracle VirtualBox, choose File > Check for Updates and run the installation package that is downloaded.
Figure 1: RI8608A Linux NUC (ASUS NUC 14 Pro)

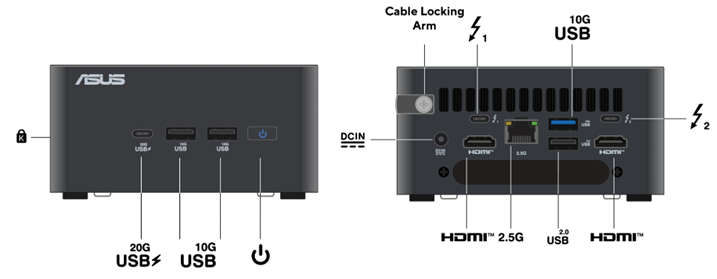
Figure 4: USB RIFL Master TIM with USB Cable
ASUS 14 PRO Documentation
ASUS NUC 14 Pro|NUCs|ASUS USA