Two different Test Plans can be compared with the Test Plan Editor's user interface. Three File menu options allow for the active Test Plan to be compared graphically or the source text to the history of that Test Plan. The comparison is very sensitive, resizing a window or moving a button will count as a change. Also if test sections are moved, it will appear as all subsequent tests are also changed, so there are no attempts to align blocks. So this is really only effective on similar Test Plans with minor changes. Diff also compares Limits and other attributes, the graphical compare will only show test panels. The goal is to ignore insignificant differences, and the process below tries to accomplish this, showing two different tools.
WinMerge graphically displays differences (see Figure 1) and can be configured to filter insignificant lines and can save .HTML reports. Use the Tools > Filters to ignore changes instead of a Notepad++ Macro to remove the insignificant differences.
Notepad++ with Compare Plus Plugin compare two testplans with a visual representation of the text based testplan as shown in Figure 2. The process uses Guru Browser to export a .GZP, which is renamed .ZIP and opened in the Windows desktop. The testplan file names are the Guru CreationID (CID) of the objects and often the largest files in the archive. Enter Regex values to ignore in the Compare Plus plugin and generate the compare results. If order does not matter, sorting the whole testplan alphabetically aligns states and makes general comparisons easier to navigate. This process can be adapted to use other applications which compare text files.
Reference
To Prepare WinMerge
1. Use winget to install Notepadd++ by opening a command window and type the following:
winget install --id=WinMerge.WinMerge -e
2. Start WinMerge Windows application and choose Tools > Filters... > Line Filters then click New and copy the relevant Regular Expressions from Table 1 below.
3. Continue on To Prepare Testplans for Compare Steps
To Prepare Notepadd++
1. Use winget to install Notepadd++ by opening a command window and type the following:
winget install --id=Notepad++.Notepad++ -e
2. Start Notepadd++ windows application and choose Plugins > Plugins Admin...
3. Type "Compare" into the Search field, select Compare Plus from the list and choose Install.
4. Choose Macro > Start Recording. (it's ok to have an empty file)
5. Choose Search > Replace... and enter ",location=+\d*@\d*,extent=+\d*@\d*" (between the quotes) in the Find what: field, leave Replace with: blank and then choose Replace All.
6. Choose Search > Replace... and enter ",id=+\d*,parent=+\d*" (between the quotes) in the Find what: field, leave Replace with: blank and then choose Replace All.
7. Choose Macro > Stop Recording, then Macro > Save Current Recorded Macro as "Cleanup testplan Remove location and id" (optional assign keyboard shortcut)
8. Continue on To Prepare Testplans for Compare Steps
To Prepare Testplans for Compare
1. Use Guru Browser to identify the two testplans to compare. Choose RiTestplan from below the ro.sys.ObjClass pull down menu. (see Figure 2)
2. Filter with any other relevant Guru Keys or use the Revision History tab and select the two or more testplans, then choose Send to Export List from the right mouse button menu. (See Figure 3)
Note: Write down the last few characters of the 16 character ri.sys.CID for each testplan that will be used to open the testplan files later.
3. Choose Guru Export List and then click on Export. (See Figure 4)
4. When it is done creating the .GZP file, copy it to the Windows desktop and rename the file and append ".ZIP" to change the file extension or file type.
5. Double click on the .ZIP file(s) to open with File Explorer.
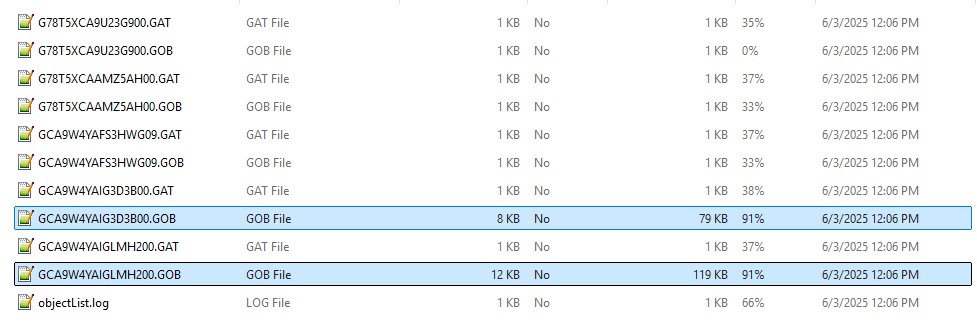
6. Copy the two largest .GOB files that correspond to each Testplan to the desktop and rename each .GOB file with the Title & Version of the Testplan. Use the objeclList.log to confirm attributes of the two selected testplans.
7. Double click on a .GOB and choose WinMerge or Notepad++ and click on Always. This associates .GOB files with WinMerge or Notepad++.
8. Continue on To Prepare Testplans for Compare Steps
To Compare Testplans
1. Choose File > Open and select the location and file name of the older testplan first and then the newer one (oldest on left) and choose Compare (or Plugins > Compare Plus > Compare).
2. New lines appear as green, changes in orange and removed lines in red.
Table 1: Regular Expressions (RegEx) to Ignore
| Regular Expression | Comment |
| ,location=+\d*@\d*,extent=+\d*@\d* ,id=+\d*,parent=+\d* | State Button Locations within a Test Panel |
| size=* timeStamp=* optimizeOrder=* viewOrder=* sectionIndex=* editReference=* | Metadata for Tests, Sections, etc... |
| Use Select Next (?s)(?<=::TEST).*?(?=:END) (?s)(?<=::DEFAULTS).*?(?=:END) (?s)(?<=:SYMBOLS).*?(?=:CHECKSUM) | Edit > Line Operations > Sort Alpha Macro > Run Macro > Run Macro Multiple times... until end of file. |
Figure 1: WinMerge Comparison
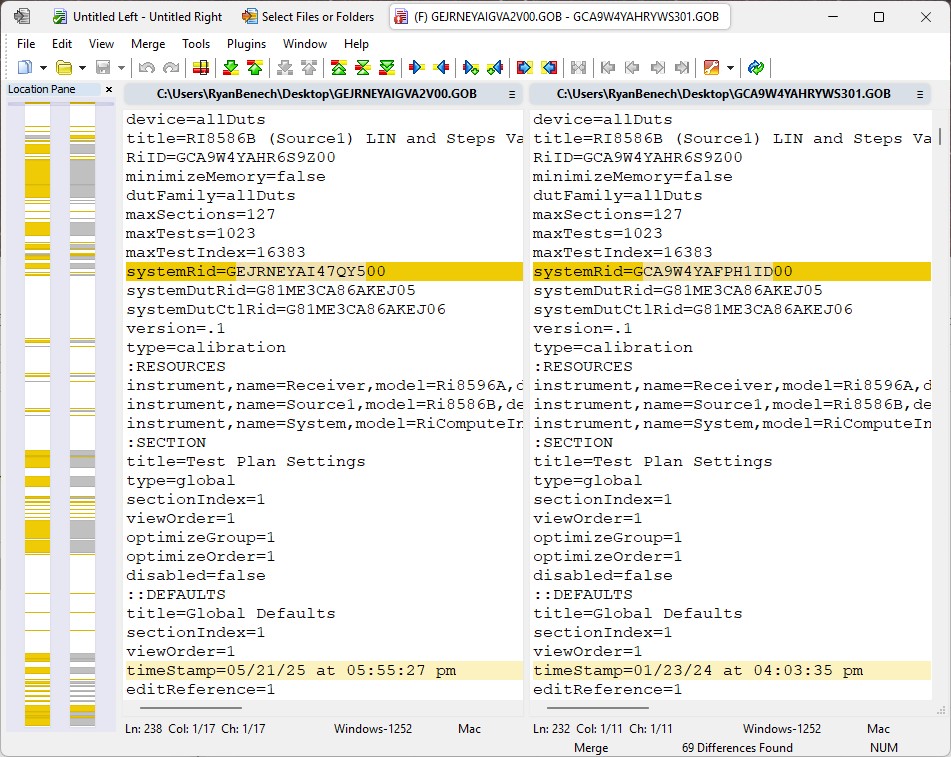
Figure 2: Guru Browser RiTestplan Revision History
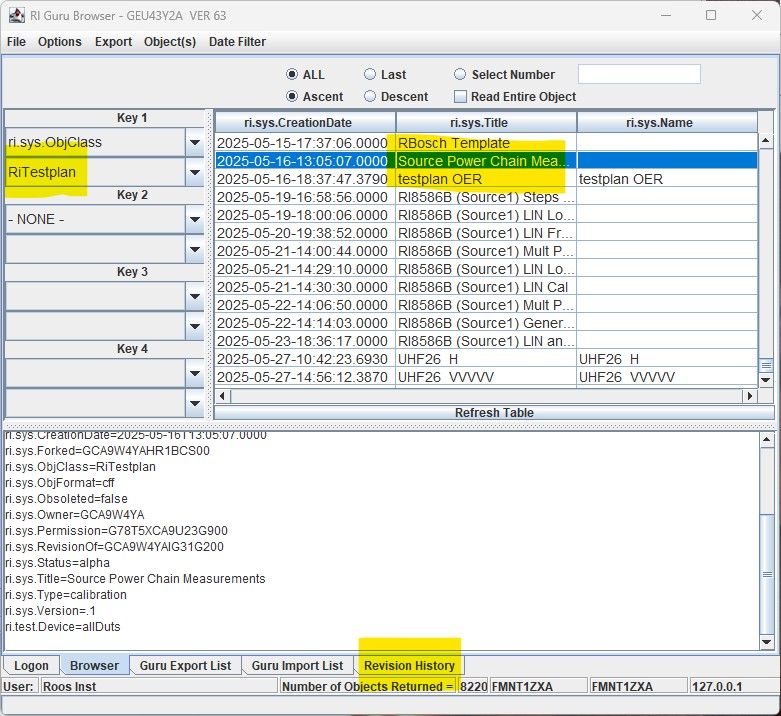
Figure 3: Guru Browser Send to Export List

Figure 4: Guru Browser Export List > Export

Figure 5: Contents of .GZP renamed to .ZIP and open in File Explorer