The Cassini Tester uses a Linux NUC to connected with a USB RIFL Master TIM; these procedures describe how to upgrade a RI8568A-B-C Cassini 16 Infrastructure to use the new Linux NUC and how to downgrade to go back to use the ArcaOS EPC TIM. RI8568D Cassini 16 Infrastructure comes with a native USB Type-B Connection and RIFL Master embedded in the infrastructure.
To Upgrade RI8574 ArcaOS EPC TIM and Connect RI8613A USB RIFL Master TIM and RI8608 Linux NUC:
- Follow the steps to power off the EPC. (ArcaOS > Shut Down... > Power Off)
- On the Cassini 16 Infrastructure, rotate the Power Switch to the OFF position.
- Disconnect all cables from the RI8574 ArcaOS EPC TIM.
- Unlatch the RI8574 ArcaOS EPC TIM from the Cassini 16 Infrastructure (T0 Location) and remove the TIM. (see Figure 2)
- Attach the RI8613A USB RIFL Remote TIM to T0 Location and latch the TIM. Be sure the latch is fully closed.
- Place the RI8608 Linux NUC on a workspace (desk) or attach to a VESA Mount on the Display or Cassini Infrastructure (P/N N0T9464A). (See Figure 4)
- Connect the Power Supply to the wall receptacle and to the Linux NUC DC-In port.
- Attach the USB cable between the RI8613A USB RIFL Master (see Figure 3) and the RI8608 Linux NUC. Connect the Keyboard/Mouse, Network and Display.
- Power ON the Linux NUC by pressing the power button. (See Figure 4)
- On the Cassini 16 Infrastructure, rotate the Power Switch to the ON position to activate the RI8613A USB RIFL Remote TIM.
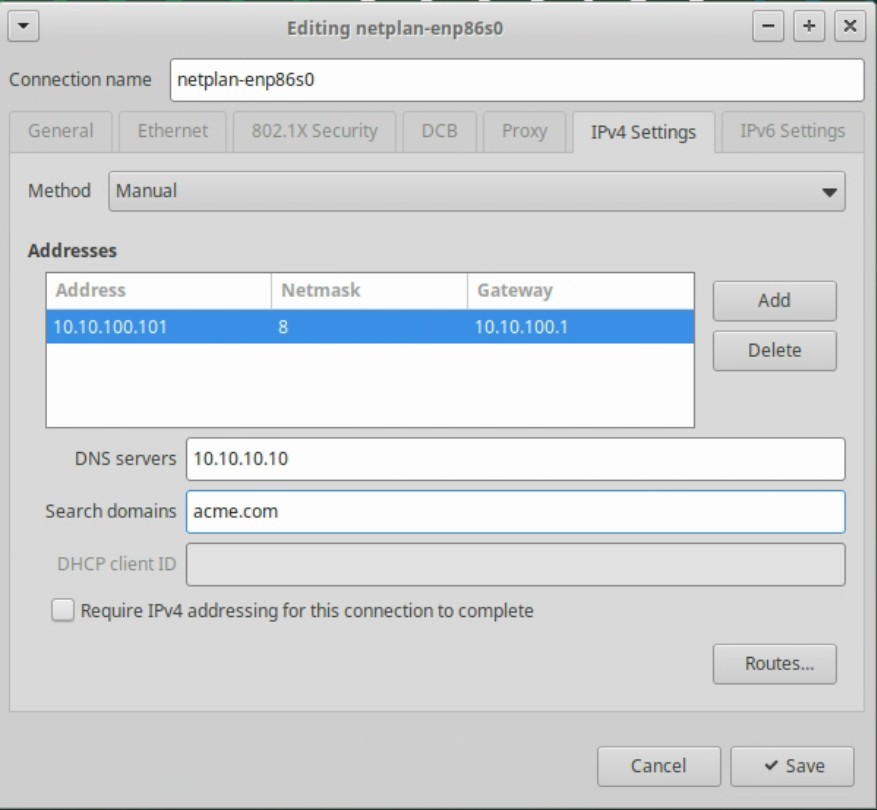
- Follow the Exchange Linux NUC Checklist ( https://roos.com/docs/RBEH-DG2R6U ) to set Network Address, Host name, Timezone and other common configuration options. Be prepared to provide the MAC Address (LAN) id (##-##-##-##-##) found on the bottom label of the NUC (See Figure 5). Use the Network Manager UI from the task bar to configure for your corporate LAN and startup the Tester (see Figure 6 and 7).
- Follow the steps to To Change Guru ID and Update the RiTesterDef used by Saturn (below).
- Upgrade the RiSystem object by following the steps To Modify the RI System Object .
remove "epc3=on" and add the following lines to support running Cassini in Container:
remoteRifl=on
ritdbDir=/home/cassini/Cassini16-D/RiApps/data/
vBox-D=/home/cassini/Cassini16-D/ - Restart Guru by choosing System > Shutdown from the Guru bar.
- Restart Saturn by choosing the X in the upper right corner and confirming that it closes. Saturn should restart automatically.
To Downgrade, Remove RI8613 USB RIFL Master TIM and Connect RI8574 ArcaOS EPC TIM:
The following procedure will downgrade the system controller. Please contact [email protected] and describe any issues with the RI8608 Linux NUC.
- Follow the steps to power off the System Controller. (OS > Logout > Shut Down...)
- On the Cassini 16 Infrastructure, rotate the Power Switch to the OFF position.
- Disconnect the USB cable from the RI8613A USB RIFL Remote TIM. (It is OK to leave the Linux NUC running.)
- Unlatch the RI8613A USB RIFL Remote TIM from the Cassini 16 Infrastructure (T0 Location) and remove the TIM.
- Attach the RI8574 ArcaOS EPC TIM to T0 Location and latch the TIM. Be sure the latch is fully closed.
- Connect the VGA Display cable, Ethernet Network and Keyboard/Mouse.
- On the Cassini 16 Infrastructure, rotate the Power Switch to the ON position to activate the EPC and follow the steps to startup the Tester.
- (Optional) Follow the Exchange RI8574 ArcaOS EPC TIM Checklist https://roos.com/docs/RBEH-APL2LM to set Network Address, Host name, Timezone and other common configuration options.
- Downgrade the RiSystem object by following the steps To Modify the RI System Object and add "epc3=on" and remove "remoteRifl=on" (other options can be left alone).
To Modify the RiSystem Object:
- USE CAUTION, do not modify RiSystem objects as it could affect other testers.
- Logon to Guru and choose Apps > Guru Explorer.
- Choose RiSystem from the Key1 pull down menu below RiObjectClass.
- Choose ri.sys.Owner from the Key2 pull down menu.
- Choose the Guru ID for the current system (displayed in the status bar) and choose Edit > Attributes and Object.
- Make the required modifications. Add or remove lines when upgrading/downgrading to or from the Linux NUC.
- Choose File > Save then close Guru Explorer.
To Change Guru ID and Update the RiTesterDef used by Saturn: (See Rename Tester)
The RiTesterDef object is used to assign Instrument Names by storing the serial number and the preferred name. This object must be manually specified in Saturn and is loaded from the Tester menu in Cassini app. If upgrading or moving the Linux NUC to a different tester, follow the steps below to choose the correct Tester Def.
- Identify the correct Tester Def. From the Cassini app, choose System > Tester button, the active tester def title is displayed in the window's title bar.
- Open a Terminal window to activate Guru ID and restore config. (Note: Contact Roos Support for ".vfd file if it is not already installed -- replace <ID> with the actual Guru ID i.e. "GM23AVCA")
sudo mount -t vfat -o loop ~/Downloads/<ID>GuruKeys.vfd /media/floppy -o gid=disk
sudo unzip -o /media/floppy/GURUKEYS/<GuruID> -d /media/floppy/
~/RiApps/guruServer/guruServerStop.sh
~/RiApps/guruServer/startApp.cmd -RiBackupGuru <ServerIP> -RiUpdateGuru <ServerIP> - From Guru choose Logon and System > Restore to get all owned objects, including the Guru Address book entries.
- Update Saturn config by matching RiTesterDef Name in line 22 of bootCassini.txt. Open a Terminal window and type:
nano ~/RiApps/GuruApps/GF10RE2A/bootCassini.txt
Replace <TESTER DEF NAME> and close and save.
sync,topic=admin/app,omap=^runLocal+channel=rtalk+className=rtalk.SmPortalForRtalk+rtLoad=GAKRE8CABJADXV00+rtDebug=true+rtLaunch=RiRemoteViewModels:register+tester=<TESTER DEF NAME> - Close Saturn and it will restart automatically, using the updated Tester to assign instrument names.
Note: The Cassini app lauched from Short Cuts menu in the VirtualBox container loads the last saved TesterDef or what is saved in the RiPreferences object that is updated with Options > Save State.
Hardware Compatibility:
The Linux NUC does NOT include display cable(s), network cables or USB Keyboard/Mouse. An HDMI, USB-C to USB-C (Thunderbolt), or USB-C to Displayport cable may be required to connect to the Display. The old VGA cable is not compatible with the Linux NUC. Some RI8574 ArcaOS EPC TIMs included a PS/2 Keyboard and mouse that are not physically compatible with the Linux NUC without a PS/2 to USB adapter.
Software Compatibility:
The RI8608 Linux NUC runs Linux "xUbuntu 24.04 LTS" (or later) and includes Guru Saturn application to operate the Cassini system. The Cassini application is also available running in a virtual ArcaOS container and is referred to as "Cassini in Container".
With a Guru connection (system button is green), then all Guru apps will automatically get the latest version and no migration is needed. For example, if calibrating the Tester with the Linux NUC, then switching to the ArcaOS EPC, the software will automatically use the latest Cal Data available in Guru.
Requirements:
The RI8608 Linux NUC requires a USB RIFL Master provided by the RI8613A USB RIFL Master TIM when using RI8568(A-B-C) Cassini 16 Infrastructure model. The rev-D Cassini16 Infrastructure includes native USB RIFL Master built-in to the Infrastructure and is not compatible with the RI8574 ArcaOS EPC TIM. The RI8608 Linux NUC replaces the "computer" in the RI8574A EPC TIM. The RI8613A contains the 10 MHz reference clock and physical RIFL adapter needed to control the tester via USB cable. A USB Type A to USB Type B cable to connect with the Linux NUC is included with RI8613A or RI8568D.
A network connection is required before Guru and Saturn is launched automatically. Wait for the "Tester Loaded" message in Saturn's message window before launching the Cassini application from the Short Cuts menu.
See also:
To Setup a Static IP Address:
The Linux NUC will be pre-configured to get a network configuration using DHCP. Most corporate LANs prefer assigning Static IP address to Testers. To proceed, get the assigned IP Address (##.##.##.##), Netmask (##), Default Route (##.##.##.##). and DNS Server(s) (##.##.##.##), provided by your network administrator. The Hardware Address (MAC) is visible from the Connection Information display or the serial lable on the bottom of the Linux NUC device. Access the Network Manager > Edit Connections... (See Figure 1) window to create or edit the configured ethernet settings (See Figure 2). The Roos Guru auto-start script waits for a network connection before launching the software and will not work offline. Refer to the RI8608 Linux NUC Admin Guide https://roos.com/docs/RBEH-DFTNQE for more configuration options.
Subnet Mask or Netmask is in "CDIR" notation
/24 255.255.255.0
/21 255.255.248.0
/16 255.255.0.0
/8 255.0.0.0
Figure 1: MXUT4W4B USB RIFL Remote TIM
Figure 2: Installed RI8613A USB RIFL Remote TIM
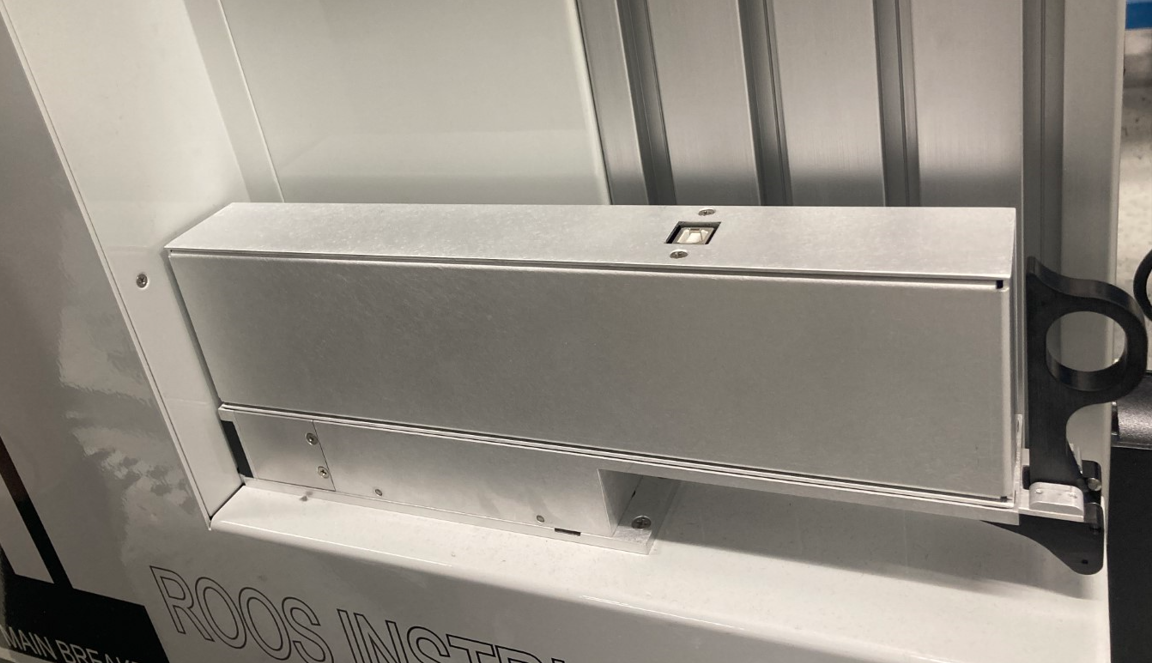
Figure 3: USB cable connected with RI8613A USB RIFL Remote TIM
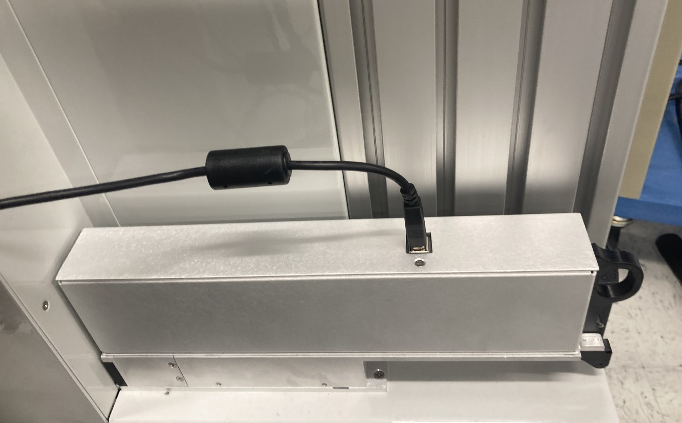
Figure 4: Linux NUC Front/Back
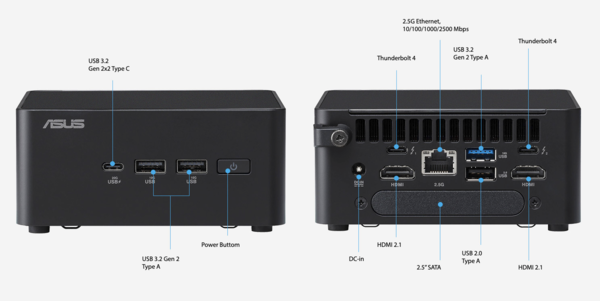
Figure 5: Bottom of Linux NUC Showing MAC Address (LAN)
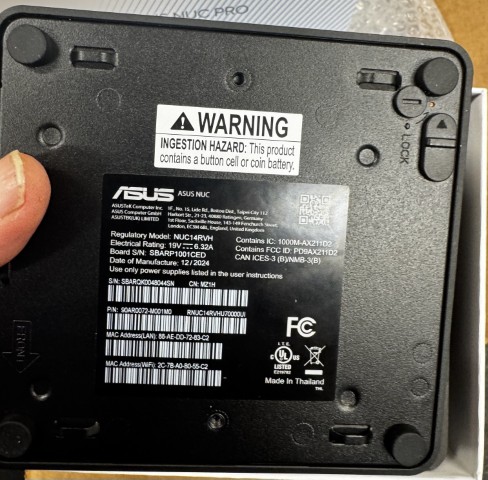
Figure 6: Linux NUC Network Configuration (xUbuntu 24.04 LTS) > Edit Connections..
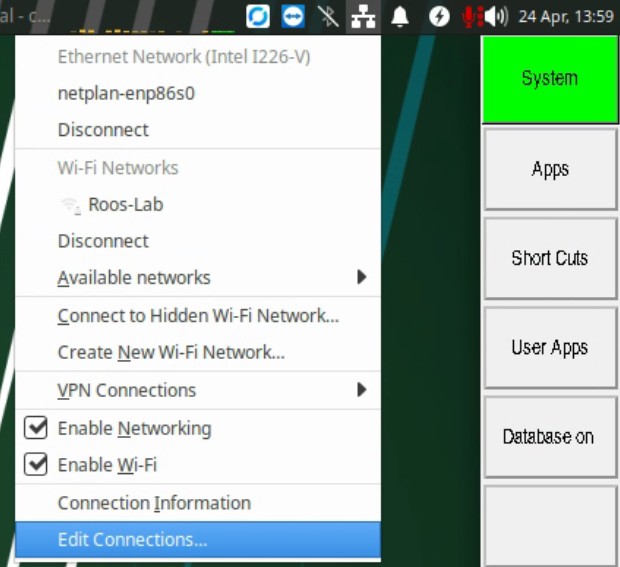
Figure 7: Adding Static IP